During the recent history of doping in cycling, and in professional athletics in general, I've been trying to find a way to reconcile my genuine admiration for so many of the individual athletes involved against the backdrop of what their sports represent, and how doping affects those sports. In particular, my thoughts have centered on Lance Armstrong, cycling, and my own sport, triathlon.
I choose to remain a Lance Armstrong fan, and I want him to continue to publicly participate in sports for as long as he has the desire to do so.
Why? Simply because I like watching him do what he does so well.
And that's what professional sports are all about: Watching. They are a form of entertainment, where sponsors pay money to become affiliated with a sport in return for getting their name out there and building an association between the attributes of the brand and the attributes of the sport. That relationship bears its greatest fruit only when there is Winning, simply because the sponsors want to be associated with triumph and other "second-to-none" attributes. Those who win the most tend get the most money. It's true for athletes, teams, and companies.
I've come to realize that the biggest drug in sports isn't a pharmaceutical, it's money.
Money provides access to many performance-enhancing benefits. With money, you can give up your day job, hire a coach, train in exotic locations year-round, use the best equipment, get the best medical attention to maximize recovery and minimize down-time, all of which in turn lets you enter more races and win more of them, getting not only the purses, but also the ability to attract more sponsors and demand more money from them.
And, yes, money does provide access to cutting-edge performance-enhancing drugs. Many of us already rely on legal performance-enhancing drugs, chief among them being caffeine, second being prescribed steroids and beta agonists (vital to millions of amateur endurance athletes with exercise-induced asthma). The difference between legal and illegal performance-enhancing drugs isn't a sharp line. It isn't even a line at all, but rather a blurry mess filled with seemingly arbitrary decisions and regulations.
The main problem is that no specific drug is illegal until it becomes known, and until a reliable test for it has been devised. There is always a lag between creating a new drug and the test for it. If a new drug is developed in secret, is it automatically legal or illegal? It is now the case that it is automatically illegal, but it wasn't always that way.
Sports regulations always lag advances in technology. Of all athletic sports, perhaps cycling has benefited the most from technology. Early cycling used solid rubber tires, and was revolutionized by the introduction of pneumatic tires. Many wanted derailleur technology outlawed when it first appeared, back when bikes had at most two gears, and you had to flip your rear wheel to use the other one. The "Superman" riding position wasn't illegal until it was first used and was then promptly declared to be illegal. Aerobars were a gray area until they were specifically allowed in time trials, but nowhere else. The introduction of ultra-light-weight frames and unconventional geometries caused the UCI to impose a minimum weight requirement on bicycles along with the requirement for a triangular frame. Clip-in pedals and electronic shifting are other examples of recent cycling technologies.
It can't be a surprise, given that so much technology has been applied to equipment, that a similar level of technology wouldn't be applied to the athletes. Advances in training, coaching, and nutrition have come fast and furious, as have advances in medication. This should not be a surprise to anyone, especially to cycling fans.
Let's take a small detour and talk about Oscar Pistorious. His Ossur "Cheeta" running leg is most certainly a wonderful technological innovation, one that was outlawed from Olympic competition until this year. What few realize is that Oscar was granted an individual exemption: His leg is still barred by current Olympic rules. I believe the event organizers knew Oscar had no real shot at a medal, and wanted to test the waters before committing to a rule change.
How is a mechanical performance-enhancing technology different from a pharmaceutical one? What if it turns out that Usain Bolt had his leg bones removed and replaced with carbon fiber?
I am completely unable to make a judgement in this area. It's just too messy, both factually and philosophically. Are we going to start outlawing specific genes at some point? I believe sport has to find better ways to exist in a world that includes technological advances that are at least temporarily undetectable.
There is one sport that has faced the doping issue head-on: Amateur Weightlifting. It has three categories: No Limits (no drug testing), Some Drugs, and Natural/Raw. Athletes choose the category in which they wish to compete. You can switch to a higher-drug category any time you want, but going drug-free takes time and testing. Record holders in the Natural/Raw category are literally half the size and lift half as much as those in the No Limits category, but are treated no less as champions.
But what about professional sports? I doubt any sane company would intentionally sponsor anything other than Natural athletes. No national sport would ever permit anything else. Yet they still impose insane pressures to Win. To me, this is a no-win situation for the athletes, who must win to survive. If one athlete crosses the line and gets away with it, it is hard to see how the entire sport won't go in that direction. Recent history is filled with abundant proof that this has indeed happened multiple times, and on a large scale.
Do I want professional sports to become "clean"? Absolutely! But I also refuse to blame only the athletes for the failures of an entire sports system, from sponsors to media to fans.
I also don't want to see athletes forced to squirm under interrogation, like Bill Clinton asking for a very specific definition of "sex" (one that would hopefully be limited to intercourse). While a "mea culpa" from Lance would soothe feelings, I see no real reason why it should be expected from him. I see no way it can really help anything one way or the other. So I refuse to ask him for one.
I do not know how professional sports can best cope with and remedy the situation going forward. Professional sports is primarily an entertainment business, and we don't outlaw actors who take drugs, do we? Quite the opposite: Don't even get me started on reality TV shows like "Celebrity Rehab" (but not for the reasons you may think).
One thing I do know is that professional sports must make a clean break with its past in order to change going forward, and that includes a change of personnel at all levels, including sponsors, organizers, staff and, yes, athletes. So excluding Lance from cycling may be necessary, independent of his innocence or guilt.
That said, I do know what I choose to think about the athletes whose careers have been affected: I will not blame individual athletes for pursuing and achieving what their sport, sponsors and fans have demanded of them. This is not amnesty: Turnover is needed. But what should come next for these athletes?
I want Lance, and all athletes affected by this upheaval, to be free to compete in other sports. While cycling may be closed to him (a messy decision I would not revisit), I would very much like to see him be permitted to participate at all levels of his original championship sport: Triathlon.
Go Lance!
Saturday, December 8, 2012
Saturday, August 4, 2012
THIS is why we buy the best we can afford from TCSD sponsors!
Those
of you who have gone swimming with me have undoubtedly heard, many
times, how much I love my De Soto T1 wetsuit. I've had it for 4 years
now, always treated it carefully, without a single nail-dig or gouge or
rip or tear. It is the only wetsuit I've ever raced in.
Then, while leading the Swim Buddies at the Solana BeachTriathlon , I ripped the left leg of my bib-john, just below the knee. I was putting it on standing up (which I never do), started to lose my balance, then pushed my foot down without bending to bring my hands down too: The suit ripped at my hand, just below the knee.
The rip started at a few inches long, but after three times around the swim course, with three entries and exits, the rip had made the complete circle.
I was heartbroken. I went to the De Soto HQ the next day, and turned the pieces of my suit over to Steve Haslett, who told me it would be ready in under two weeks. I begged and pleaded, since I had no backup wetsuit, and I really wanted to race the Aquathalon on the next Thursday. Those of you who saw me at that race also saw my wetsuit with its practically invisible repair.
The bill for the massive repair, on a rush schedule? Nada. Zilch. Zero. Totally free. 100% covered by the De Soto Lifetime Warranty.
I don't know if there are any wetsuits more expensive than a De Soto (before the generous TCSD discount, of course), but my own experience tells me there is no greater quality and no better value. I've always loved it for its comfort and performance, and the quality materials and construction. De Soto knows their suits will get frequent use for many years, and they back them, and their owners, completely.
I added it up, and I figure I have at least 400 hours in the water with this wetsuit, probably 500. I asked Steve what the realistic lifetime is for wetsuit material that is well cared for and has minimal sun exposure. While there are no hard and fast numbers, we figured I was getting near the limit.
I'm going to take extra-special care of my repaired bib-john, but I'll also start saving for my next bib-john: When another repair is needed, this bib-john will become my backup, and I'll start the process all over again with a new one!
Thanks, De Soto! For making a great product, backing it unconditionally, and most of all, for being a TCSD Sponsor.
P.S.: I've been asked why I bought a top-of-the-line wetsuit as my first wetsuit, before I even knew how to swim! During the first weeks of my exposure to triathlon four years ago, I asked an elite-level athlete (whose name I have forgotten - sorry!) what the most important things are for a newbie to know when buying triathlon equipment. His answer surprised me: "Comfort. Anything that touches your body must be comfortable. Spend whatever time and money it takes to make it happen: You will be a better and happier triathlete for it."
I took that advice to heart, starting with my De Soto wetsuit, my De Soto trisuit, and my ISM Adamo Road bike saddle. Over the past 4 years I've tried everything else I could get my hands on, including several pairs of shoes. But the gear I still wear the most is the top-quality and comfortable gear I bought first.
Save money wherever you need to, but don't compromise on the things that touch your body. Buy quality used gear before buying a lesser new product. The best place to find quality used gear? The TCSD Classifieds, of course!
Friday, June 29, 2012
How to Apply a Wetsuit
A fellow triathlete recently asked for a better idea than messy wetsuit glue for fixing fingernail tears.
The "better idea" is to never let fingernails anywhere near the outside of a wetsuit! This is extremely easy to accomplish, and we teach it to every first-timer at the Thursday Open Water Bay Swim clinics.
The first thing to remember is that there is no race to put on a wetsuit! Take your time, and focus on proper handling of the wetsuit. The exterior of a wetsuit is quite delicate, but the inside has a fabric lining and is very rugged. The key concept is to touch the inside as much as possible, and avoid touching the outside.
1. We normally dry our wetsuits inside-out, so the first step is to turn it right-side-out.
2. Next, peel down the top until the openings for both legs are visible.
3. Sit down. Trying to put a wetsuit on standing up is asking for trouble.
4. Grabbing on each side of a leg hole, insert one leg until it hits firm resistance. When doing this, do NOT pull hard on the leg of the wetsuit. A firm tug should be all that's needed.
Tip: New wetsuits can be very stiff, and it takes hours of use for the elasticity to increase. This means it can be quite difficult to get the foot out the bottom of the leg hole. One way to ease this is to spray the foot and ankle with lots of expensive Tri-Slide. Another way is to use a free plastic shopping bag: Fast and easy, and it's something I never run out of and never have to buy.
5. Push the other foot in the other leg hole until it also hits resistance. At this point, you'll have both legs in the wetsuit, with perhaps ten inches of wetsuit leg extending beyond the foot. This is why sitting down is important.
6. On each leg, roll the wetsuit leg down while pulling the foot up (along with the wetsuit). If the foot slides free, give another tug to set it snugly. Keep rolling each leg down until you are about six inches away from your foot.
7. Grab the rolled edge and pull until the foot pops out the end hole. Then roll it down further and pull more until the leg hole rides over your ankle and some way up your calf. (This extra pull is important - I'll explain why later.) Repeat for the other leg.
At this point, you are sitting down with both feet through the leg holes, but with lots of wetsuit around and over your legs and feet. Looking down, the part of the wetsuit closest to you should be the rolls you were tugging on to get your foot through the leg holes. If it isn't this way, in the words of Picard, "Make it so!"
8. On one leg, reach about 2-3 inches below the roll on each side of your leg, pinch the loose wetsuit material, and pull just those few inches up your leg. It should be very easy. Repeat on the other leg.
9. Go back and forth between each of your the legs, pulling 2-3 inches on each leg, until it either becomes awkward to grab the roll and pull, or your feet become visible.
10. If you used plastic shopping bags, reach down and pull them off your feet.
11. Now stand up, being sure not to stand on the top or arms of your wetsuit.
12. Keep doing alternating short roll-pulls on each leg until you run out of leg.
Note: As you pull the wetsuit upward, pulling may become unexpectedly difficult. No, it's not a comment on the tightness of the wetsuit or the shape of your body: It simply means the outer wetsuit is rubbing against and sticking to the inner wetsuit. Create some slack by pulling up the outer portion.
Tip: One of the most important factors in putting on a wetsuit (and selecting one that fits) is to have it fit snug in the crotch without being either too tight or too loose. While too tight will certainly announce itself, you may not notice too loose until you are swimming in cold water, and realize your wetsuit isn't keeping you warm. This is due to the loose crotch material acting as a reservoir and serving as a pump, forcing the warm water from your wetsuit and exchanging it with cold, something that will happen due to incidental leg motion even if you don't kick while swimming.
13. At this point, you should be able to see if you have too little material available for the crotch of the wetsuit to fit snugly. If this is the case, peel the wetsuit down each leg and repeat all the above steps starting at Step 7. (This is why that extra tug during Step 7 can be important!)
Now it is time to get the wetsuit over the hips, something that can be a challenge for all but the skinniest of us. Again, this gets easier as a new wetsuit gains elasticity and conforms to your body.
14. Keep doing the same pinch-and-pull operation just below the edge of the roll. Some may be able to make progress pinching on each side of the hips, but others will need to use both hands on each side, alternating back and forth, and maybe adding some Body-English.
15. It can sometimes be difficult to get the suit over the butt. Worry not, there's a trick for that! Put both hands behind your back and grab the wetsuit roll. Then squat down and pull HARD as you stand back up. I've never seen that technique fail to get the job done.
16. Keep going until the wetsuit is near the middle of the ribs, or until you can't pull it any higher.
Before we start on the arms, take a moment to check the snugness of the crotch. It will either be just right, or there will be some extra material gathered there. To move the extra down toward the ankles, just push your palms against each side of each leg, and smooth the excess down to your ankles. No pulling or fingernails are required, and this is the only time it should be necessary to touch the outside of your wetsuit.
17. The arms can go much like the legs, but if you are lucky, a plastic bag on each hand will permit it to go completely through on the first try. If not, you'll need to do a one-handed pinch-and-pull on each side of your arm until the wetsuit is up to the elbow on each side. If there is someone nearby who knows this technique, they can help you get the arms up much more quickly.
18. Getting the shoulder into the wetsuit comes next, and there are a few ways to do this. The lucky folks just extend both arms straight up in the air, and everything just pops into place. Other folks will need to roll the collar down, then grab above the shoulder and pull it over. Then there will be a few who need assistance, where a helper reaches between the wetsuit and your arm to stretch it slightly, then will pull it up over your shoulder. And some will need to do all the above, in whatever order works best.
As with the crotch, it is important to get the wetsuit snug against the armpit, without having folds of material there when you arms are at your side. If you can't get snugness without folds, then add a minimal amount of gap by smoothing the wetsuit down your arm (like you may have done with the legs) until the folds go away.
19. Next comes the zipper. While some folks can do this on their own, don't even consider it until your wetsuit has lots of hours on it (and elasticity): Pulling too hard on the zipper is the #1 cause of wetsuit damage. Pinch your shoulders backward, and get a bystander to pull the zipper up.
20. Finally, the collar. If it is too loose, it will permit cold water to flow into your wetsuit. If it is too tight, it will be acutely uncomfortable. The best is to have it barely tight enough to keep the water out. It may take a few test swims and adjustments to find where this point is. And if you are new to swimming with a wetsuit, it will always feel too tight for your first several swims. Don't worry: You will adapt, and the right collar adjustment will eventually feel right as well.
I know this sounds like it is a very long procedure, but believe me, it gets faster and faster with practice, and as the wetsuit gains elasticity.
Eventually, you will be in a situation where you will need to put on a wet wetsuit. Most will tell you this is simply not possible, or is more hassle than it is worth. But they'd b e wrong! The above technique even works when the wetsuit is soaked! It may take slightly more time, but if you are patient, it will work even then.
It is very likely that the above verbal description has left some you absolutely confused. If you'd like to help me either take some photos to add here, or even to make a video, please let me know!
Friday, June 1, 2012
TitanFlex Di2 & Bike Math
I did another 30 mile ride on my TitanFlex Ultegra Di2, and with better preparation I saw better performance. I still rode hard and fatigued myself, but there was no bonking this time. I rode up that last rise into Del Mar at an average of 11 mph, almost a 50% improvement, and finished only 3 minutes behind the group leaders. (Many thanks to the stop signs and lights that slowed them down to closer to my speed.)
My goal for this ride (aside from finishing with less embarrassment) was to see how best to take full advantage of the Di2 capabilities. I leaned one Big Thing, and one Little Thing.
First the Little Thing: It is so fast and easy to pick up or drop lots of gears with Di2! I practiced simultaneous shifts, and never came close to a bad shift. I clicked the buttons as fast as possible to select the front and rear gears without waiting for the shift to complete, then relieved pedal pressure for a moment until the derailleurs became quiet. I can press buttons far faster than I can twist a lever, and the time to shift was amazingly short, significantly faster than I had expected, or even hoped for. I'd estimate multi-gear shifts happen nearly twice as fast as before.
Now the Big Thing: Front shifts are now the same as rear shifts! This means there is absolutely no need to stay on the current chainring and use a gear ratio that's "close enough" if there's a slightly better gear ratio available on the other chainring. This means that it is now well-worth knowing the order of the gear ratios across all chainring/sprocket combinations, and knowing how to get from one to the next.
And that leads us to the Bike Math portion of this post. Let's look at what one pedal stroke does: One rotation of the crank causes the chain to pass through the number of teeth on the current chainring. Since the chain isn't elastic, that means the same number of teeth must pass over the currently selected sprocket in the rear cassette, which in turn causes the rear wheel to rotate.
Let's take the example of my granny gear: 34 teeth in front, and 28 in the rear. How many times will the rear wheel rotate due to one full pedal stroke (one full crank revolution)? We know that the chain will have been pulled forward by 34 teeth after one revolution of the crank. When the chain moves 34 links forward, the first 28 links will cause one rear wheel revolution, and the remaining 6 links will cause just under 1/4 of a revolution of the rear wheel. The precise number of revolutions is 34/28 = 1.21 revolutions.
And that's our formula to convert front strokes to rear wheel revolutions: Divide the number of teeth in the front chainring by the number of teeth in the rear sprocket. This number is called the gear ratio.
But how far will that one full turn of the crank make us move? We know that each full rear wheel rotation moves us forward by an amount equal to the circumference of the rear wheel. But what is the circumference of our rear wheel?
Don't worry: There's no need to measure the diameter of the rear wheel then use trigonometry or equations with Pi in them! Every tire has its "ISO size" on it, which consists of 2 numbers separated by a dash, or it may be written as a fraction. My tires have an ISO size of "23/622". And the ISO specification gives the circumference for each size, which in my case is 214 cm, or 2.14 meters, which is a hair over 7 feet. I got this number from one of Sheldon Brown's excellent web pages.
So how far forward do I go for one turn of the crank in my granny gear? We know the rear wheel rotated 1.21 revolutions, which means I moved forward 7 x 1.21 = 8.47 feet. (It sure didn't feel like that much on that last hill into Del Mar!)
And that's another formula: Distance forward per crank rotation is the gear ratio times the tire circumference.
That's all fine and everything, but what I really want to know is: How fast was I going? I know I was pedaling with a cadence of about 90 RPM, which means my crank turned 90 times every minute, which means that during that minute the rear wheel turned 90 multiplied by the gear ratio times the wheel circumference of 7 feet to give us our forward motion. So our speed was 90 crank revolutions per minute x 1.21 rear wheel revolutions per crank revolution x 7 feet per rear wheel revolution.
This is getting too hard to say in words! Let's try using an equation to restate all the above in a more condensed form:

Well, a value of 762.3 feet/minute is what comes out of the equation, given the units we've been using. Let's convert it to the more familiar units of miles per hour:

A speed of 8.66 miles per hour is very close to what my Garmin reports, so it seems the math actually works! We can't expect an exact match, since things like tire wear and inflation pressure affect the effective circumference of the tire. But this value is certainly useful as-is.
Now that we've calculated the speed we expect to see for a given cadence when using a specific chainring and sprocket, what about the other gear ratios associated with all possible combinations of front chainrings and rear sprockets? With 2 in the front and 10 in the rear, that's 20 total combinations. Let's figure them all out!
I have a compact crankset that has front chainrings with 34 and 50 teeth. My rear cassette is an 11-28, which contains 10 sprockets with the following tooth counts: 11, 12, 13, 14, 15, 17 19, 21, 24 and 28. The speeds listed assume a 90 cadence.
Hmmm... It seems that there is some redundancy in my system of gears! The combinations of 34/19 and 50/28 have nearly the same ratio, and the combinations of 34/13 and 50/19 have ratios differing by half a percent. That means that out of our 20 gear combinations, only 18 of them are truly unique.
It gets worse: The range of ratios on the large chain ring have substantial overlap with the range of ratios on the small chain ring: The upper 7 ratios on the small ring overlap with the lower 5 ratios on the large ring! With the overlap removed, we are left with no more than 15 non-overlapping gear combinations!
However, this overlap is to be expected, given the wide tooth range on my rear cassette. A cassette with a minimal tooth range, such as 12-23, is called a "corncob", and will have much less overlap, sometimes none at all, depending on the front chainring selection.
Fortunately, not all the gear combinations in the overlap zone are wasted: Several of the overlap ratios on the large chainring fit nicely between those on the small chainring. Let's sort the above table by ratio and see how it looks. I'll also add the sprocket number for later use.
This list shows why I picked the chainrings and cassette I did: I get to have a great granny gear (34/28) while still having one top-end gear above 30 mph (50/11). Well, I didn't quite pick them that way: That's just how they turned out, since I picked the widest front and rear tooth-count ranges that the Ultegra Di2 derailleurs can accommodate. There are wider cassette and chainring ranges available, but they aren't Di2-compatible.
Sorting the list places the redundant ratios next to each other, making their similarity easier to see. Notice too that, except near the redundant ratios, the overlapped ratios ping-pong back and forth between the front and rear chainrings.
The overlap zone ranges from a speed of 14.91 mph up to 22.13 mph. This happens to be the speed range I spend the vast majority of my time in. Let's see what it would take to use these gears.
Let's say I'm hammering at nearly 24 mph in gear 50/15. (Hey, that is hammering for me!) I'm starting to tire, and I'd like to ease up just a bit. The next lower ratio is 34/11, which is on the other chainring, and 4 rear shifts away. And if I tire a bit more, the next ratio down has me switching chainrings again, then doing 5 rear shifts.
With a manual shift system, that would certainly be way too much shifting for way too little gain, but with the Di2 it is just a total of 5 button clicks for the first and 6 clicks for the second. And that's as bad as it gets: The other gears within the overlap are fewer shifts apart. Let's make a table of the front and rear shifts needed to get through all the ratios in-order,skipping whichever redundant ratio makes for less shifting:
50 19 (7) 2.63 18.84
50 28 (10) 1.79 12.78
It is interesting to see that minimal shifting is obtained by dropping the redundant ratios on the large chainring.
So, I now have a shift list, and since it looks pretty random and hard to memorize, I'll want to have it with me while riding, which means I'd probably want to tape it to my handlebars or wear it on my wrist. A small hassle, but certainly do-able.
But there is one other factor to consider: I always need to know which rear sprocket is in use! Since there is no gear indicator, that means I'll either have to remember, or more likely I'll have to take a look back before deciding which shift is needed.
I'll give it a try to see if it is worth the effort.
My goal for this ride (aside from finishing with less embarrassment) was to see how best to take full advantage of the Di2 capabilities. I leaned one Big Thing, and one Little Thing.
First the Little Thing: It is so fast and easy to pick up or drop lots of gears with Di2! I practiced simultaneous shifts, and never came close to a bad shift. I clicked the buttons as fast as possible to select the front and rear gears without waiting for the shift to complete, then relieved pedal pressure for a moment until the derailleurs became quiet. I can press buttons far faster than I can twist a lever, and the time to shift was amazingly short, significantly faster than I had expected, or even hoped for. I'd estimate multi-gear shifts happen nearly twice as fast as before.
Now the Big Thing: Front shifts are now the same as rear shifts! This means there is absolutely no need to stay on the current chainring and use a gear ratio that's "close enough" if there's a slightly better gear ratio available on the other chainring. This means that it is now well-worth knowing the order of the gear ratios across all chainring/sprocket combinations, and knowing how to get from one to the next.
And that leads us to the Bike Math portion of this post. Let's look at what one pedal stroke does: One rotation of the crank causes the chain to pass through the number of teeth on the current chainring. Since the chain isn't elastic, that means the same number of teeth must pass over the currently selected sprocket in the rear cassette, which in turn causes the rear wheel to rotate.
Let's take the example of my granny gear: 34 teeth in front, and 28 in the rear. How many times will the rear wheel rotate due to one full pedal stroke (one full crank revolution)? We know that the chain will have been pulled forward by 34 teeth after one revolution of the crank. When the chain moves 34 links forward, the first 28 links will cause one rear wheel revolution, and the remaining 6 links will cause just under 1/4 of a revolution of the rear wheel. The precise number of revolutions is 34/28 = 1.21 revolutions.
And that's our formula to convert front strokes to rear wheel revolutions: Divide the number of teeth in the front chainring by the number of teeth in the rear sprocket. This number is called the gear ratio.
But how far will that one full turn of the crank make us move? We know that each full rear wheel rotation moves us forward by an amount equal to the circumference of the rear wheel. But what is the circumference of our rear wheel?
Don't worry: There's no need to measure the diameter of the rear wheel then use trigonometry or equations with Pi in them! Every tire has its "ISO size" on it, which consists of 2 numbers separated by a dash, or it may be written as a fraction. My tires have an ISO size of "23/622". And the ISO specification gives the circumference for each size, which in my case is 214 cm, or 2.14 meters, which is a hair over 7 feet. I got this number from one of Sheldon Brown's excellent web pages.
So how far forward do I go for one turn of the crank in my granny gear? We know the rear wheel rotated 1.21 revolutions, which means I moved forward 7 x 1.21 = 8.47 feet. (It sure didn't feel like that much on that last hill into Del Mar!)
And that's another formula: Distance forward per crank rotation is the gear ratio times the tire circumference.
That's all fine and everything, but what I really want to know is: How fast was I going? I know I was pedaling with a cadence of about 90 RPM, which means my crank turned 90 times every minute, which means that during that minute the rear wheel turned 90 multiplied by the gear ratio times the wheel circumference of 7 feet to give us our forward motion. So our speed was 90 crank revolutions per minute x 1.21 rear wheel revolutions per crank revolution x 7 feet per rear wheel revolution.
This is getting too hard to say in words! Let's try using an equation to restate all the above in a more condensed form:

Well, a value of 762.3 feet/minute is what comes out of the equation, given the units we've been using. Let's convert it to the more familiar units of miles per hour:
A speed of 8.66 miles per hour is very close to what my Garmin reports, so it seems the math actually works! We can't expect an exact match, since things like tire wear and inflation pressure affect the effective circumference of the tire. But this value is certainly useful as-is.
Now that we've calculated the speed we expect to see for a given cadence when using a specific chainring and sprocket, what about the other gear ratios associated with all possible combinations of front chainrings and rear sprockets? With 2 in the front and 10 in the rear, that's 20 total combinations. Let's figure them all out!
I have a compact crankset that has front chainrings with 34 and 50 teeth. My rear cassette is an 11-28, which contains 10 sprockets with the following tooth counts: 11, 12, 13, 14, 15, 17 19, 21, 24 and 28. The speeds listed assume a 90 cadence.
Chainring Sprocket Ratio Speed
50 11 4.55 32.54
50 12 4.17 29.83
50 13 3.85 27.53
50 14 3.57 25.57
50 15 3.33 23.86
50 17 2.94 21.06
50 19 2.63 18.84
50 21 2.38 17.05
50 24 2.08 14.91
50 28 1.79 12.78
34 11 3.09 22.13
34 12 2.83 20.28
34 13
2.62 18.72
34 14
2.43 17.39
34 15
2.28 16.23
34 17
2.00 14.32
34 19
1.79 12.81
34 21
1.62 11.59
34 24
1.42 10.14
34 28
1.21 8.66
Hmmm... It seems that there is some redundancy in my system of gears! The combinations of 34/19 and 50/28 have nearly the same ratio, and the combinations of 34/13 and 50/19 have ratios differing by half a percent. That means that out of our 20 gear combinations, only 18 of them are truly unique.
It gets worse: The range of ratios on the large chain ring have substantial overlap with the range of ratios on the small chain ring: The upper 7 ratios on the small ring overlap with the lower 5 ratios on the large ring! With the overlap removed, we are left with no more than 15 non-overlapping gear combinations!
However, this overlap is to be expected, given the wide tooth range on my rear cassette. A cassette with a minimal tooth range, such as 12-23, is called a "corncob", and will have much less overlap, sometimes none at all, depending on the front chainring selection.
Fortunately, not all the gear combinations in the overlap zone are wasted: Several of the overlap ratios on the large chainring fit nicely between those on the small chainring. Let's sort the above table by ratio and see how it looks. I'll also add the sprocket number for later use.
Chainring Sprocket Ratio Speed
50 11 (1) 4.55 32.54
50 12 (2) 4.17 29.83
50 13 (3) 3.85 27.53
50 14 (4) 3.57 25.57
50 15 (5) 3.33 23.86
34 11 (1) 3.09 22.13
50 17 (6) 2.94 21.06
34 12 (2) 2.83 20.28
50 19 (7) 2.63 18.84
34 13 (3)
2.62 18.72
34 14 (4)
2.43 17.39
50 21 (8) 2.38 17.05
34 15 (5)
2.28 16.23
50 24 (9) 2.08 14.91
34 17 (6)
2.00 14.32
34 19 (7)
1.79 12.81
50 28 (10) 1.79 12.78
34 21 (8)
1.62 11.59
34 24 (9)
1.42 10.14
34 28 (10)
1.21 8.66
This list shows why I picked the chainrings and cassette I did: I get to have a great granny gear (34/28) while still having one top-end gear above 30 mph (50/11). Well, I didn't quite pick them that way: That's just how they turned out, since I picked the widest front and rear tooth-count ranges that the Ultegra Di2 derailleurs can accommodate. There are wider cassette and chainring ranges available, but they aren't Di2-compatible.
Sorting the list places the redundant ratios next to each other, making their similarity easier to see. Notice too that, except near the redundant ratios, the overlapped ratios ping-pong back and forth between the front and rear chainrings.
The overlap zone ranges from a speed of 14.91 mph up to 22.13 mph. This happens to be the speed range I spend the vast majority of my time in. Let's see what it would take to use these gears.
Let's say I'm hammering at nearly 24 mph in gear 50/15. (Hey, that is hammering for me!) I'm starting to tire, and I'd like to ease up just a bit. The next lower ratio is 34/11, which is on the other chainring, and 4 rear shifts away. And if I tire a bit more, the next ratio down has me switching chainrings again, then doing 5 rear shifts.
With a manual shift system, that would certainly be way too much shifting for way too little gain, but with the Di2 it is just a total of 5 button clicks for the first and 6 clicks for the second. And that's as bad as it gets: The other gears within the overlap are fewer shifts apart. Let's make a table of the front and rear shifts needed to get through all the ratios in-order,skipping whichever redundant ratio makes for less shifting:
Chainring Sprocket Ratio Speed
50 11 (1) 4.55 32.54
Shift: 0 1
50 12 (2) 4.17 29.83
Shift: 0 1
50 13 (3) 3.85 27.53
Shift: 0 1
50 14 (4) 3.57 25.57
Shift: 0 1
50 15 (5) 3.33 23.86
Shift: 1 4
34 11 (1) 3.09 22.13
Shift: 1 5
50 17 (6) 2.94 21.06
Shift: 1 4
34 12 (2) 2.83 20.28
Shift: 0 1
34 13 (3)
2.62 18.72
Shift: 0 1
34 14 (4)
2.43 17.39
Shift: 1 4
50 21 (8) 2.38 17.05
Shift: 1 3
34 15 (5)
2.28 16.23
Shift: 1 4
50 24 (9) 2.08 14.91
Shift: 1 3
34 17 (6)
2.00 14.32
Shift: 0 1
34 19 (7)
1.79 12.81
Shift: 0 1
34 21 (8)
1.62 11.59
Shift: 0 1
34 24 (9)
1.42 10.14
Shift: 0 1
34 28 (10)
1.21 8.66
It is interesting to see that minimal shifting is obtained by dropping the redundant ratios on the large chainring.
So, I now have a shift list, and since it looks pretty random and hard to memorize, I'll want to have it with me while riding, which means I'd probably want to tape it to my handlebars or wear it on my wrist. A small hassle, but certainly do-able.
But there is one other factor to consider: I always need to know which rear sprocket is in use! Since there is no gear indicator, that means I'll either have to remember, or more likely I'll have to take a look back before deciding which shift is needed.
I'll give it a try to see if it is worth the effort.
Saturday, April 21, 2012
TitanFlex Ultegra Di2
I am a low-wattage athlete. Maybe 150 watts continuous, tops, and that's with some of the best coaching and training available. Much of this is due to my low ability to absorb oxygen: The most important and overworked muscle in most of my workouts is my diaphragm.
So I'm always looking for ways to get the most out of what I've got. In the swim, I use the Vance method: Very long, powerful strokes, emphasizing precise form, combined with breathing on every stroke. On the run, I wear the lightest shoes I can find that are also comfortable and don't interfere with my gait.
Then there's the bike. I'm not able to do much grinding: The oxygen needed to support long, deep muscle contractions quickly outstrips my ability to provide it. So I favor lots of quick, short contractions, which means I'm a "spinner": I maintain a high cadence that's able to produce good power (for me) over a fairly wide range (85-115 rpm). I need lots of gears to make the best use of my limited power production, and that means I'm always shifting.
I've compared myself with other riders, and I think I shift about twice as often as most. I'm really amazed by folks who forget to downshift at a stop light, and are able to pull away and get back up to speed using a single gear. When that happens to me, I need to push away with my foot, and hope I have enough speed to downshift.
Shifting to always be in precisely the right gear is a priority with me, since missed shifts cost me so much. Downshifting is my greatest challenge: I've broken two chains over the past 4 years due to approaching a steep hill with lots of speed, and not being able to get into my granny gears fast enough, needing to apply power before the final shift completed in order to avoid coming to a complete stop. A broken chain definitely makes you stop.
Part of the problem was having so many gears to shift through: I'm one of the few triathletes I know who rides with a triple in front. Switching from a fast descent to a steep hill means I may need to drop 29 speeds! Of course, I don't visit each one individually, but I do need to shift through 2 in the front and 9 in the rear. That's lots of wrist motion! And that takes lots of time, which I often run out of when I don't start downshifting early enough.
But that's not the worst: On a long ride with gentle rolling hills, I'm shifting many times each minute. By the end of a long ride, my wrists can hurt more than my legs.
I want to make each shift quicker, and also make multiple shifts easier. I could do wrist exercises, but I'd rather rely on technology, and that means electronic shifting. I dreamed about getting the Shimano Dura Ace Di2 when it came out, but the price of the upgrade would mean I'd need to stop spending money on things like food.
When the rumors of an Ultegra Di2 were confirmed and samples of the new gruppo, the Shimano Ultegra 6770 Di2, were shown, I was glad I waited: The electronics technology in the new Ultegra Di2 is more advanced than that in the Dura Ace Di2 (slim 2-conductor cables vs. bulky 5-conductor cables), though the mechanical technology is a bit simpler (larger, heavier) but no less capable.
The downside is that Ultegra Di2 and Dura Ace Di2 electronics don't mix: You can't, for example, use a Dura Ace derailleur with an Ultegra shifter. But that may change next year: Dura Ace will be switching to the Ultegra cabling system, though it remains to be seen if Shimano will use the same connectors and signaling to permit components to be mixed.
Best of all, the Shimano Ultegra Di2 gruppo costs the same as the Dura Ace mechanical gruppo! With such a large price advantage, my next step was to talk with my bike's creator, Tom Piszkin (prolific inventor, owner of AIRO-Series, former TCSD President, current TCSD Sponsor and Winter Track Coach, and the list goes on) to determine what it would take to upgrade my TitanFlex Al-Ti bike from my current Ultegra triple to a compact Ultegra Di2.
My first concern was going from 30 gears down to 'only' 20: To keep my lowest granny gear, we'd need to go with the smallest front chainrings the Ultegra Di2 supports (50-34), along with the widest-range cassette (11-28) in order to keep a decent (but lower) high-end. Well, aside from steep descents, I seldom used my top gear, so that's not much of a loss.
Another factor was the distance between gears: The steps between gears would be about 50% larger. So if a single gear change at fixed speed on my triple caused a cadence change of 6-7 RPM, I could expect my new compact gears to cause about a 10 RPM change. That's quite a difference, but I decided it should be compatible with my spin range, though I'd need to work on widening it even further.
After several email exchanges with Tom, we decided the TitanFlex looked to be an ideal Di2 platform, and that the risk of problems was minimal. Tom had been wanting to make a TitanFlex Di2 for some time, but there was no way he could justify equipping a demo bike with Di2, and no customer had yet ordered one. So Tom made me a very sweet deal to be his prototype Di2 installation, with the agreement that I would work with him to perfect the installation over time. And I also had to do as much of the teardown and cleanup as possible before I delivered the bike.
Tom started working on the bike last Thursday, April 20th, and I picked it up the next day. Talk about quick work! But there was a hitch: Tom had done all the mechanical work, and since I'm an engineer, he wanted me to do the electronic adjustments. Our agreement was indeed a partnership on this project.
However, considering that I had previously never been able to make my own derailleur adjustments, I did have some concerns. Fortunately, the Shimano instructions, though limited, provided the information I needed. But it was dark by the time I finished last night, so I was unable to take a test ride to make sure I did it right.
This morning I took my TitanFlex Di2 to the TCSD Saturday Ride. I thought it would be wise to do my first ride surrounded by experienced folks, just in case I got myself into trouble and needed advice. Best of all, Brian Long had offered to lead a slower group: Did I mention I haven't ridden my bike much since last season ended? Yeah, I definitely needed a slower group.
Once we started on the coastal ride, I immediately had trouble shifting - the shift buttons felt very stiff. Well, not really: It turned out that I was used to combining force with motion on my old shifters. The new shifter buttons moved only about 1\4", so I instinctively used much less force. Once I corrected for this, shifting was positive, consistent, and effortless.
And the shifting was quiet: A rapid but faint click-buzz-snick was the sound I heard, and the shift was completed before I could get my finger off the button. Evidently, I hadn't screwed up the adjustments. When we came to our first mild positive grade I intentionally delayed shifting until I was just starting to struggle, then quickly shifted to the right gear. I would estimate the process was about 20% faster than the best I ever did with my mechanical cable shifters.
Another neat feature was the complete absence of chain-rub against the front derailleur: As you switch rear sprockets, the system automatically moves the front derailleur as needed to keep clear of the chain. That's a nice touch that I really appreciate, especially when I'm in aero and don't want take an arm out only to adjust away the noise.
When we came to the flat at the top of the grade I dropped into my clip-on aero bars and proceeded to accelerate. As those of you who have them know well, shifting while in aero with clip-on aero bars is not a simple process: You must take an arm out of aero and reach over to the brake-shifters in order to change gears. And you can only do one side at a time: A combination shift means coming out of aero, doing the shift, then returning.
For single shifts, the buttons made a huge difference for me: Much less wrist motion and shorter contact with the button meant my arm was back in aero a bit sooner.
I tested several shifting situations on the way to the Carlsbad Starbucks, though none of them included any serious climbs or descents. But soon after leaving the Starbucks and starting back, I realized my experiments on the way up and my time away from riding had combined to yield some serious bonking. My power had diminished greatly, as had my ability to spin effectively.
It was also at this point that I realized I had completely forgotten to bring water with me. I was so focused on getting the bike ready that I had forgotten that one small detail. Sure, I could stop at a store and buy some, but I decided to see how well my new gears worked while I was wimped-out.
The ride back went well: The increased distance between gears was not a significant issue. I spent every moment I could in aero to reduce the effort required, and every shift was quick and clean, which was not always the case for me when riding bonked on my prior system.
Then came that last rise into Del Mar, and my legs informed me that 29.8 miles was just the distance they needed to complete their transformation from flesh into lead. Despite being tired, the shift into my granny gear was delightfully quick, and the ratio was just what I needed to creep up the hill at a stately 6.5 mph.
So, that's the story and the review. Now for the pictures! Here's a shot of the whole bike (click to enlarge):


Why is this picture here? Yes, those are my clip-on aero bars. They are also where I will mount the remote shifter buttons Shimano will be releasing in the next 6-9 months. You heard me right! Coming soon to a bike near me: Clip-on aero bars with remote shifters! Woo-hoo!
That's the tour! You've seen everything, right? Well, those of you who've also drooled over Di2 will have noticed there's one component missing: Where's the battery? Where is that bloated black blob that ruins the appearance of almost every Di2 bike in existence?
This is why you want a true inventor, and the creator of your bike, to do your Di2 installation: Tom hid the battery just in front of the rear wheel. It is masked from one side by the front derailleur, and from the other side by the frame fairing. Here's a look from the top: That's the rear wheel on the left, and the front derailleur on the right.

Sorry for the over-exposure, but it's dark back there and I had to use the flash. The battery is mounted vertically, and when released drops down from the bottom of the frame. You can see the corner of the battery peeking below the chainstay in the next photo. It's also partly covered by the chainring.

One note about the battery: While Shimano doesn't specify the number of shifts per charge, I've been able to figure out from several sources that I shouldn't need to charge the battery more than 3-4 times each year.
Now you've seen it all. But there's still one question to answer: Was it worth the price?
Sure, I always like new shiny things that encourage me to train more. Heck, I just like them anyway. But this was absolutely a major investment for me: Does the performance justify the expense?
I must admit that I do miss the tight grouping of the gears on my triple. I would have loved it if Shimano had made a triple version of the Ultegra Di2. But since I did fine on my first ride despite bonking, I don't think it's really much of an issue: Just something to get used to.
The system has met every one of my expectations, and I made sure that I had realistic expectations right from the start. I suppose the lack of surprises was one of the best surprises! Shimano delivered everything they promised, and the features I wanted most were demonstrated and proven.
So, yes, at this early point the system seems worth it. We'll see if that changes once I ride more miles and complete some races.
One thing for sure: The TitanFlex is an ideal Di2 platform. Tom will soon be updating the TitanFlex web site to include an Ultegra Di2 option, and I expect that bike will represent an ideal combination of technology and function.
I know mine does!
So I'm always looking for ways to get the most out of what I've got. In the swim, I use the Vance method: Very long, powerful strokes, emphasizing precise form, combined with breathing on every stroke. On the run, I wear the lightest shoes I can find that are also comfortable and don't interfere with my gait.
Then there's the bike. I'm not able to do much grinding: The oxygen needed to support long, deep muscle contractions quickly outstrips my ability to provide it. So I favor lots of quick, short contractions, which means I'm a "spinner": I maintain a high cadence that's able to produce good power (for me) over a fairly wide range (85-115 rpm). I need lots of gears to make the best use of my limited power production, and that means I'm always shifting.
I've compared myself with other riders, and I think I shift about twice as often as most. I'm really amazed by folks who forget to downshift at a stop light, and are able to pull away and get back up to speed using a single gear. When that happens to me, I need to push away with my foot, and hope I have enough speed to downshift.
Shifting to always be in precisely the right gear is a priority with me, since missed shifts cost me so much. Downshifting is my greatest challenge: I've broken two chains over the past 4 years due to approaching a steep hill with lots of speed, and not being able to get into my granny gears fast enough, needing to apply power before the final shift completed in order to avoid coming to a complete stop. A broken chain definitely makes you stop.
Part of the problem was having so many gears to shift through: I'm one of the few triathletes I know who rides with a triple in front. Switching from a fast descent to a steep hill means I may need to drop 29 speeds! Of course, I don't visit each one individually, but I do need to shift through 2 in the front and 9 in the rear. That's lots of wrist motion! And that takes lots of time, which I often run out of when I don't start downshifting early enough.
But that's not the worst: On a long ride with gentle rolling hills, I'm shifting many times each minute. By the end of a long ride, my wrists can hurt more than my legs.
I want to make each shift quicker, and also make multiple shifts easier. I could do wrist exercises, but I'd rather rely on technology, and that means electronic shifting. I dreamed about getting the Shimano Dura Ace Di2 when it came out, but the price of the upgrade would mean I'd need to stop spending money on things like food.
When the rumors of an Ultegra Di2 were confirmed and samples of the new gruppo, the Shimano Ultegra 6770 Di2, were shown, I was glad I waited: The electronics technology in the new Ultegra Di2 is more advanced than that in the Dura Ace Di2 (slim 2-conductor cables vs. bulky 5-conductor cables), though the mechanical technology is a bit simpler (larger, heavier) but no less capable.
The downside is that Ultegra Di2 and Dura Ace Di2 electronics don't mix: You can't, for example, use a Dura Ace derailleur with an Ultegra shifter. But that may change next year: Dura Ace will be switching to the Ultegra cabling system, though it remains to be seen if Shimano will use the same connectors and signaling to permit components to be mixed.
Best of all, the Shimano Ultegra Di2 gruppo costs the same as the Dura Ace mechanical gruppo! With such a large price advantage, my next step was to talk with my bike's creator, Tom Piszkin (prolific inventor, owner of AIRO-Series, former TCSD President, current TCSD Sponsor and Winter Track Coach, and the list goes on) to determine what it would take to upgrade my TitanFlex Al-Ti bike from my current Ultegra triple to a compact Ultegra Di2.
My first concern was going from 30 gears down to 'only' 20: To keep my lowest granny gear, we'd need to go with the smallest front chainrings the Ultegra Di2 supports (50-34), along with the widest-range cassette (11-28) in order to keep a decent (but lower) high-end. Well, aside from steep descents, I seldom used my top gear, so that's not much of a loss.
Another factor was the distance between gears: The steps between gears would be about 50% larger. So if a single gear change at fixed speed on my triple caused a cadence change of 6-7 RPM, I could expect my new compact gears to cause about a 10 RPM change. That's quite a difference, but I decided it should be compatible with my spin range, though I'd need to work on widening it even further.
After several email exchanges with Tom, we decided the TitanFlex looked to be an ideal Di2 platform, and that the risk of problems was minimal. Tom had been wanting to make a TitanFlex Di2 for some time, but there was no way he could justify equipping a demo bike with Di2, and no customer had yet ordered one. So Tom made me a very sweet deal to be his prototype Di2 installation, with the agreement that I would work with him to perfect the installation over time. And I also had to do as much of the teardown and cleanup as possible before I delivered the bike.
Tom started working on the bike last Thursday, April 20th, and I picked it up the next day. Talk about quick work! But there was a hitch: Tom had done all the mechanical work, and since I'm an engineer, he wanted me to do the electronic adjustments. Our agreement was indeed a partnership on this project.
However, considering that I had previously never been able to make my own derailleur adjustments, I did have some concerns. Fortunately, the Shimano instructions, though limited, provided the information I needed. But it was dark by the time I finished last night, so I was unable to take a test ride to make sure I did it right.
This morning I took my TitanFlex Di2 to the TCSD Saturday Ride. I thought it would be wise to do my first ride surrounded by experienced folks, just in case I got myself into trouble and needed advice. Best of all, Brian Long had offered to lead a slower group: Did I mention I haven't ridden my bike much since last season ended? Yeah, I definitely needed a slower group.
Once we started on the coastal ride, I immediately had trouble shifting - the shift buttons felt very stiff. Well, not really: It turned out that I was used to combining force with motion on my old shifters. The new shifter buttons moved only about 1\4", so I instinctively used much less force. Once I corrected for this, shifting was positive, consistent, and effortless.
And the shifting was quiet: A rapid but faint click-buzz-snick was the sound I heard, and the shift was completed before I could get my finger off the button. Evidently, I hadn't screwed up the adjustments. When we came to our first mild positive grade I intentionally delayed shifting until I was just starting to struggle, then quickly shifted to the right gear. I would estimate the process was about 20% faster than the best I ever did with my mechanical cable shifters.
Another neat feature was the complete absence of chain-rub against the front derailleur: As you switch rear sprockets, the system automatically moves the front derailleur as needed to keep clear of the chain. That's a nice touch that I really appreciate, especially when I'm in aero and don't want take an arm out only to adjust away the noise.
When we came to the flat at the top of the grade I dropped into my clip-on aero bars and proceeded to accelerate. As those of you who have them know well, shifting while in aero with clip-on aero bars is not a simple process: You must take an arm out of aero and reach over to the brake-shifters in order to change gears. And you can only do one side at a time: A combination shift means coming out of aero, doing the shift, then returning.
For single shifts, the buttons made a huge difference for me: Much less wrist motion and shorter contact with the button meant my arm was back in aero a bit sooner.
I tested several shifting situations on the way to the Carlsbad Starbucks, though none of them included any serious climbs or descents. But soon after leaving the Starbucks and starting back, I realized my experiments on the way up and my time away from riding had combined to yield some serious bonking. My power had diminished greatly, as had my ability to spin effectively.
It was also at this point that I realized I had completely forgotten to bring water with me. I was so focused on getting the bike ready that I had forgotten that one small detail. Sure, I could stop at a store and buy some, but I decided to see how well my new gears worked while I was wimped-out.
The ride back went well: The increased distance between gears was not a significant issue. I spent every moment I could in aero to reduce the effort required, and every shift was quick and clean, which was not always the case for me when riding bonked on my prior system.
Then came that last rise into Del Mar, and my legs informed me that 29.8 miles was just the distance they needed to complete their transformation from flesh into lead. Despite being tired, the shift into my granny gear was delightfully quick, and the ratio was just what I needed to creep up the hill at a stately 6.5 mph.
So, that's the story and the review. Now for the pictures! Here's a shot of the whole bike (click to enlarge):

Not much is noticeably different at this distance. The new Ultegra finish is a bit darker than that of my prior gruppo, the brakes from which I kept to reduce cost

The rear electric derailleur is a bit larger and chunkier than it's cabled sibling, but not massively so. Rather than use the wire covers recommended by Shimano, Tom instead chose to use a transparent chain-slap guard: It disappears if you aren't looking for it, and doesn't hide my beautiful hologram-effect paint.

The front derailleur is huge! My rear brake was a compact model that used to fit below the upper stay: I had to switch back to my prior Ultegra brake to make room for the new derailleur. Notice also the gorgeous finish of the crank and chainring: Shimano is really stepping up the beauty factor.
Yes, I did keep my trusty Shimano STB pedals: They do everything I need them to do and more, for a small fraction of the cost of other pedals. They're part of the reason I was able to afford this wonderful upgrade in the first place!

The front view of the shifter: No more shifter cable coming out the top! They also are much narrower than what they replaced. Taken together, my cockpit is more open and much less cluttered.

The side view: There are two buttons, one textured and one smooth. The brake handle doesn't move side-to-side, and also serves to protect the buttons.

The combination status display and cable junction (two shifter button cables to one frame cable). The display shows the battery level if any shift button is held for over half a second. It has other functions used during system configuration.
 |
That's the tour! You've seen everything, right? Well, those of you who've also drooled over Di2 will have noticed there's one component missing: Where's the battery? Where is that bloated black blob that ruins the appearance of almost every Di2 bike in existence?
This is why you want a true inventor, and the creator of your bike, to do your Di2 installation: Tom hid the battery just in front of the rear wheel. It is masked from one side by the front derailleur, and from the other side by the frame fairing. Here's a look from the top: That's the rear wheel on the left, and the front derailleur on the right.
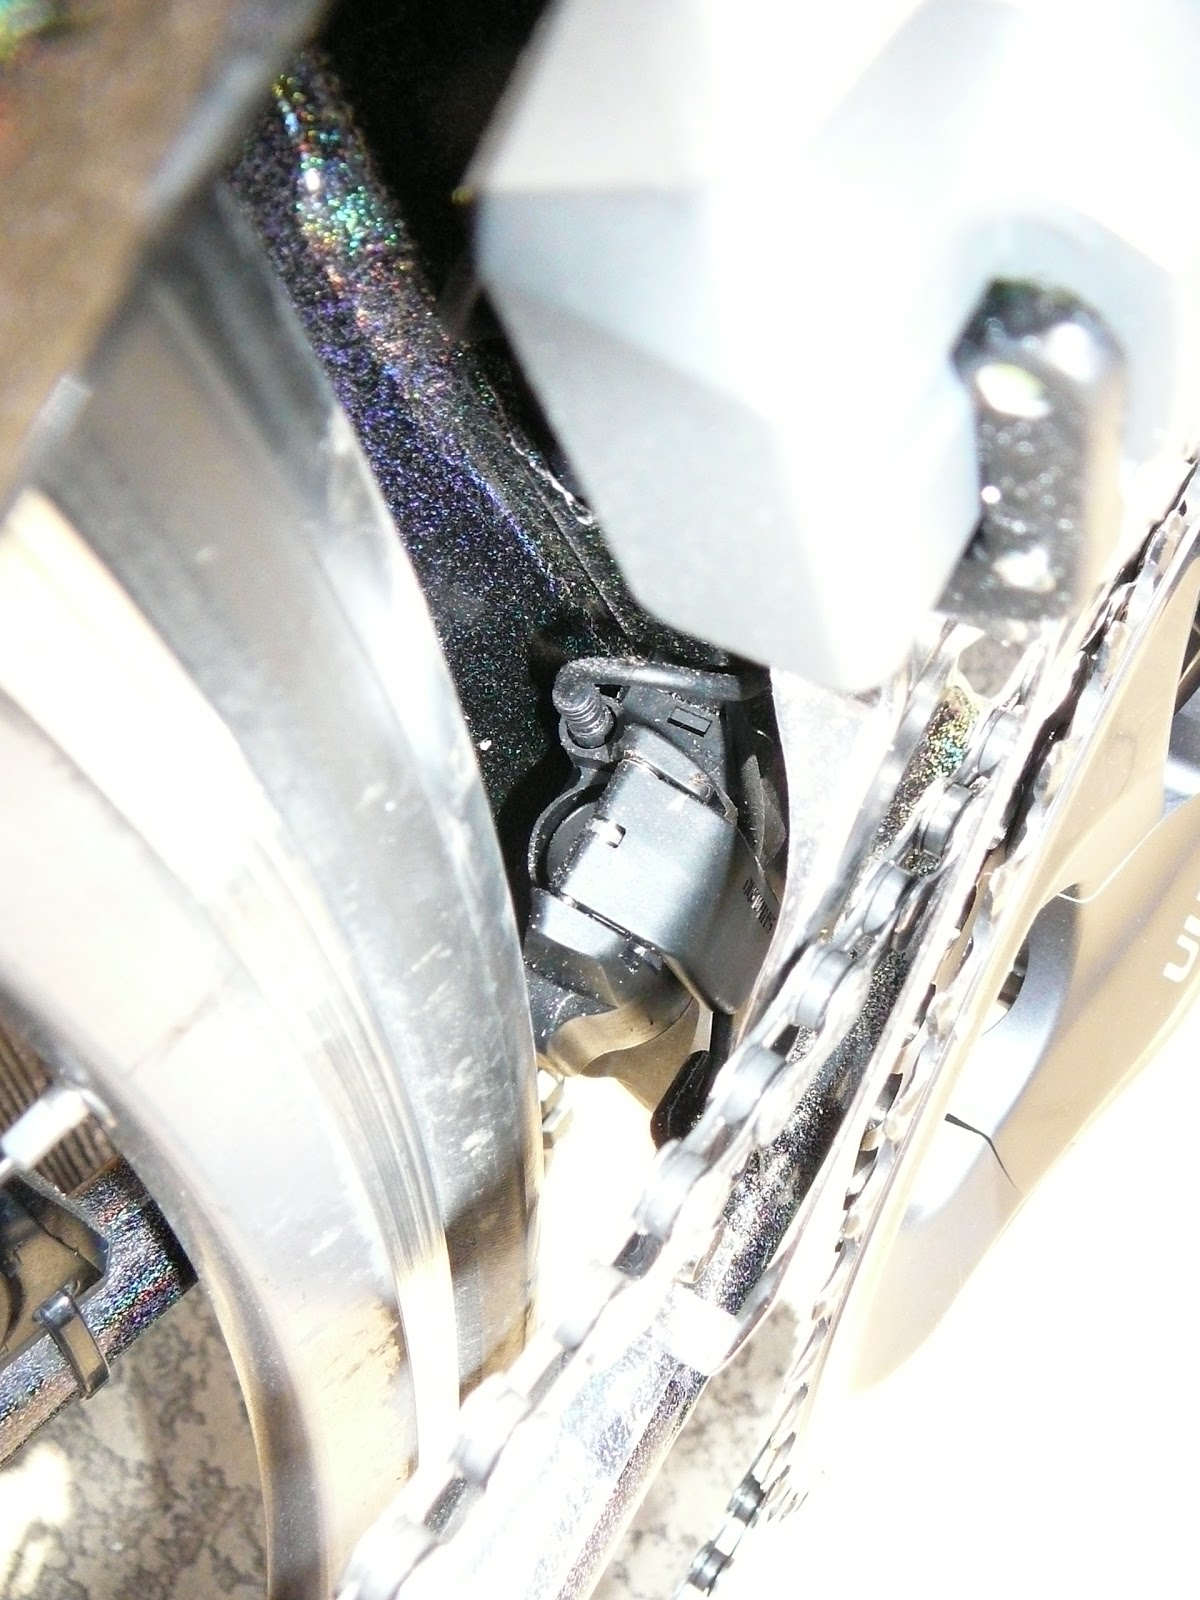
Sorry for the over-exposure, but it's dark back there and I had to use the flash. The battery is mounted vertically, and when released drops down from the bottom of the frame. You can see the corner of the battery peeking below the chainstay in the next photo. It's also partly covered by the chainring.

One note about the battery: While Shimano doesn't specify the number of shifts per charge, I've been able to figure out from several sources that I shouldn't need to charge the battery more than 3-4 times each year.
Now you've seen it all. But there's still one question to answer: Was it worth the price?
Sure, I always like new shiny things that encourage me to train more. Heck, I just like them anyway. But this was absolutely a major investment for me: Does the performance justify the expense?
I must admit that I do miss the tight grouping of the gears on my triple. I would have loved it if Shimano had made a triple version of the Ultegra Di2. But since I did fine on my first ride despite bonking, I don't think it's really much of an issue: Just something to get used to.
The system has met every one of my expectations, and I made sure that I had realistic expectations right from the start. I suppose the lack of surprises was one of the best surprises! Shimano delivered everything they promised, and the features I wanted most were demonstrated and proven.
So, yes, at this early point the system seems worth it. We'll see if that changes once I ride more miles and complete some races.
One thing for sure: The TitanFlex is an ideal Di2 platform. Tom will soon be updating the TitanFlex web site to include an Ultegra Di2 option, and I expect that bike will represent an ideal combination of technology and function.
I know mine does!
Friday, March 23, 2012
Clip-On Aerobar Reviews Considered Harmful
I used to enthusiastically
recommend my clip-on aerobars to others until I saw I was actually doing
some folks a disservice: Buying any aerobars based on reviews or
personal recommendations has a high risk of being a waste of money.
To get the best results, the selection and fitting of clip-on aerobars is a process that should be done with the assistance of a trained professional and true fit expert, preferably at a high-end bike shop.
There are so many factors involved that I consider myself fortunate that my total ignorance when I purchased mine didn't make it a waste of time and money.
Some of the factors involved include:
It is also the very best investment you can make to reduce road bike drag. Nothing else comes close. Personally, I view aero helmets as a waste, unless you routinely ride at over 30 mph for hours at a time. And that's the #2 factor after clip-on aerobars and a good aero fit. A very distant second.
The best way to buy clip-on aerobars is to put them on your bike, get them adjusted by an expert, then go for a test ride. This process takes time, and is well worth the investment.
This is why bike shops seldom discount clip-on aerobars like the online retailers do: They know that some one-on-one time is needed to select and fit the right bars. Please don't ask for this level of service then walk out without buying the bars that fit best: Be sure folks get paid when they do custom work for you.
Again, the best pre-purchase step is to first get a tri bike fit. If you don't know what the "real thing" feels like, you may have great trouble getting any clip-on aerobars to be both effective and comfortable. Be sure you get your tri bike "fit numbers", so you can use them to see how close you can push your road bike + clip-on aerobar fit.
In my case, my amazing dumb luck still wasn't perfect. My Airstryke bars came with spring-up elbow pads that permit the road bar tops to still be used. At first I thought this was an advantage, preserving all the things I like about my road bars, until I rode in my first time-trial with my clip-on aero bars. When in aero and needing to shift, the pad would pop up when I moved my arm to reach the shifters. This made it VERY awkward to get my arm back on the aerobar! My solution was to lock the pads down with tie-wraps.
Even the ideal clip-on aerobar may turn out to be less than perfect. Mine only came close after I replaced the elbow supports and strapped them down, and then experimented with my bike fit for a year.
My dumb luck got even better after I purchased my Garmin Forerunner 305: The closed front of the Airstryke bar gave me the perfect location for my Garmin bike mount, putting my 305 in an ideal position to read while in aero. All the other solutions I've seen aren't nearly as elegant or as visible. Dumb luck rocks!
For this age-grouper, the net result is that I presently have no intention of ever getting a tri bike. The investment in clip-on aerobars and finding my best fit have provided me 90% of a tri bike ride for 5% of the cost. I wish all my investments paid like that.
YMMV, of course!
Me, I'm planning to invest my savings in a Di2 gruppo for my current bike: That will permit me to add electronic shifter buttons to my clip-on aerobars! Plus, I've broken 2 chains during steep uphill shifts (I applied power before the shift completed), and I'm told that the Di2 shifts so quickly that it eliminates this problem.
To get the best results, the selection and fitting of clip-on aerobars is a process that should be done with the assistance of a trained professional and true fit expert, preferably at a high-end bike shop.
There are so many factors involved that I consider myself fortunate that my total ignorance when I purchased mine didn't make it a waste of time and money.
Some of the factors involved include:
- Upper arm length: Selecting bars with the wrong pad height can be a big mistake, if the pad height isn't adequately adjustable. Otherwise, you'll need to adjust your road bar height, which can negatively affect your road ride.
- Forearm length: Proper positioning of the pad near the elbows with the hands on the bars means the pad-to-grip positioning has to be correct, preferably adjustable.
- Elbow separation: Many amateurs can't ride with their elbows tight together like the pros. While this is most efficient for reducing drag, it can restrict breathing and make riding uncomfortable if the fit isn't precise. Pad separation must be adjustable to be as wide (or narrow) as needed.
- Wrist angle: Some folks like to bend their wrists and point their thumbs into the wind. While this is highly aerodynamic, most pros do it because it makes shifting easier. But since clip-on aerobars don't have shifters, many other, more comfortable, wrist angles are possible. Personally, I like the wrist angle with the Profile Design Airstryke (no bend at all), but others hate it.
- Upper body weight: Elbow pad 'give' needs to be balanced. Too much, and control is affected. Too little, and you can be vibrated to bits. My bars initially came with plastic elbow supports that flexed too much: Fortunately, aluminum replacements were available.
It is also the very best investment you can make to reduce road bike drag. Nothing else comes close. Personally, I view aero helmets as a waste, unless you routinely ride at over 30 mph for hours at a time. And that's the #2 factor after clip-on aerobars and a good aero fit. A very distant second.
The best way to buy clip-on aerobars is to put them on your bike, get them adjusted by an expert, then go for a test ride. This process takes time, and is well worth the investment.
This is why bike shops seldom discount clip-on aerobars like the online retailers do: They know that some one-on-one time is needed to select and fit the right bars. Please don't ask for this level of service then walk out without buying the bars that fit best: Be sure folks get paid when they do custom work for you.
Again, the best pre-purchase step is to first get a tri bike fit. If you don't know what the "real thing" feels like, you may have great trouble getting any clip-on aerobars to be both effective and comfortable. Be sure you get your tri bike "fit numbers", so you can use them to see how close you can push your road bike + clip-on aerobar fit.
In my case, my amazing dumb luck still wasn't perfect. My Airstryke bars came with spring-up elbow pads that permit the road bar tops to still be used. At first I thought this was an advantage, preserving all the things I like about my road bars, until I rode in my first time-trial with my clip-on aero bars. When in aero and needing to shift, the pad would pop up when I moved my arm to reach the shifters. This made it VERY awkward to get my arm back on the aerobar! My solution was to lock the pads down with tie-wraps.
Even the ideal clip-on aerobar may turn out to be less than perfect. Mine only came close after I replaced the elbow supports and strapped them down, and then experimented with my bike fit for a year.
My dumb luck got even better after I purchased my Garmin Forerunner 305: The closed front of the Airstryke bar gave me the perfect location for my Garmin bike mount, putting my 305 in an ideal position to read while in aero. All the other solutions I've seen aren't nearly as elegant or as visible. Dumb luck rocks!
For this age-grouper, the net result is that I presently have no intention of ever getting a tri bike. The investment in clip-on aerobars and finding my best fit have provided me 90% of a tri bike ride for 5% of the cost. I wish all my investments paid like that.
YMMV, of course!
Me, I'm planning to invest my savings in a Di2 gruppo for my current bike: That will permit me to add electronic shifter buttons to my clip-on aerobars! Plus, I've broken 2 chains during steep uphill shifts (I applied power before the shift completed), and I'm told that the Di2 shifts so quickly that it eliminates this problem.
Wednesday, March 21, 2012
Tri Bike, Road Bike, or Road Bike + Clip-On Aero Bars?
Spring has sprung, and it's the beginning of another triathlon season. As athletes make their competition plans for the year, one of the most common questions asked is if a tri bike or a road bike would be better for a given race course.
We know the pros and top age-groupers all ride tri bikes. Shouldn't we all?
First, lets review the big, fat, primary advantage of a tri bike: It permits you to ride in a very aerodynamic position for long periods of time while creating maximum power with minimum discomfort compared to a road bike. That's it. There is no other reason to get a tri bike. While there are secondary advantages, they are minor, trivial even, compared to the aerodynamics.
Let's look at what a tri bike is not:
My personal opinion is that there are lots of better ways for us non-podium folks to spend money than on a tri bike. Perhaps spend the money on travel to a distant race. Or get a power meter, a GPS training watch, and some rollers.
But if money is no option, then by all means get a tri bike! Just don't expect any magic from it: It takes work and commitment to obtain the benefits a tri bike offers.
What if you could get 80% of the benefits of a tri bike for 5% of the cost?
Remember, the primary advantage of a tri bike is all about aerodynamics. How can you improve your aerodynamics on a road bike? There are two basic ways:
However, there is one more very important negative issue with clip-on aero bars: Weight distribution.
Your center of mass shifts forward on a road bike when in the aero position, much more than it does when riding in the drops. This shift can greatly increase the amount of your weight on the front wheel, which in turn can dramatically affect handling. One of the key design features of tri bikes is to bring the rear wheel as close under the rider as possible, specifically to address the weight shift issue.
If you choose to try clip-on aero bars, be prepared to also do the following:
First, it can ruin the usefulness of your bike when riding on the roads, when riding it as a road bike. You should ensure any adjustments you make do not significantly affect the handling or comfort of your road bike.
Second, road frames tend to make lousy tri bikes. That's why the tri bike frame was invented in the first place!
When I first got into triathlon a few years ago, I already had a good fit on my Trek Madone 5.2 road bike, and I bought a tri fit from JT at Moment for two reasons: First, to learn what a good tri fit felt like, and second, it was my initial step toward deciding if I wanted to budget for a tri bike. I was surprised at how different the two fits were, and how differently my body performed in each position.
While I really liked being in aero, my back didn't handle hammering in aero very well. So I figured I should wait on getting a pure tri bike, and got my clip-on aero bars as a first step. When my back completely failed a couple years ago, I had to get a TitanFlex to isolate my back from road shock and vibration, the alternative being to give up biking, and triathlon.
Over the past year I've been experimenting with tweaks to my bike fit on my infinitely adjustable TitanFlex AlTi. The only thing not adjustable on this bike is the wheelbase and the angle of the steering tube. The titanium support beam permits the seat to move forward and back over 4 inches with a similar vertical adjustment on my seat tube, and I have an adjustable stem that permits my handlebars to be moved almost anywhere, along with adjustable clip-on aero bars and elbow pads.
As I evolved my bike fit in the space between my road and tri fit values, I developed what I call my "troad" (tri-road) fit, where I've adjusted my seat post angle to be right between that of a tri and road bike, which is the furthest forward I could move my body on the TitanFlex frame without affecting handling. I also found I couldn't get quite as flat in aero as JT's fit permitted, though I did get surprisingly close.
I think I've found a sweet spot that gives me the best aero ride a road bike can offer. We'll see if it's true as I build volume into the Spring.
If you want to buy another bike, I would suggest taking a ride on a TitanFlex with clip-on aero bars, in addition to any tri bikes you try. Experiment with finding your "troad" fit. Instead of buying a second bike, you may be able to switch to a single bike that will give you the best of both worlds.
Be sure to also try clip-on aero bars on your current road bike: Combined with a new fit and some careful adjustments, you may find your own sweet spot.
We know the pros and top age-groupers all ride tri bikes. Shouldn't we all?
First, lets review the big, fat, primary advantage of a tri bike: It permits you to ride in a very aerodynamic position for long periods of time while creating maximum power with minimum discomfort compared to a road bike. That's it. There is no other reason to get a tri bike. While there are secondary advantages, they are minor, trivial even, compared to the aerodynamics.
Let's look at what a tri bike is not:
- A tri bike is not more comfortable on long rides than a road bike: It is built for speed, not comfort.
- A tri bike is not as easy to turn as a road bike: It is optimized to go very fast in a straight line.
- A tri bike may limit your descent speed compared to a road bike: The steering can be less stable at high speeds.
- A tri bike is a hassle on courses with frequent hills and lots of turns: Moving back and forth between the shifters and brakes, and between the aero bars and the handlebars, can quickly get annoying and can lead to mistakes.
- A Tri bike should be your second bike. If you ride on roads with traffic, a tri bike can be significantly less safe than a road bike primarily due to the location of the controls (brakes and shifters aren't integrated) and the riding position (more difficult to ride upright to observe traffic and to be seen).
- It can be difficult to get enough practice time on a tri bike. Since it is not a good idea for most folks to ride a tri bike on the road, especially in groups, the best tri bike riding is often done on a closed or limited-access course, such as Fiesta Island. Which for most of us means loading the tri bike on the car and burning expensive gas in order to get a ride in.
- It can take many hours in the saddle to adapt to a tri bike fit. Maximizing performance, posture and muscle development can require lots of contact time: If you can't invest the training time, a tri bike could yield little or no improvement for a significant cost.
My personal opinion is that there are lots of better ways for us non-podium folks to spend money than on a tri bike. Perhaps spend the money on travel to a distant race. Or get a power meter, a GPS training watch, and some rollers.
But if money is no option, then by all means get a tri bike! Just don't expect any magic from it: It takes work and commitment to obtain the benefits a tri bike offers.
What if you could get 80% of the benefits of a tri bike for 5% of the cost?
Remember, the primary advantage of a tri bike is all about aerodynamics. How can you improve your aerodynamics on a road bike? There are two basic ways:
- Get comfortable spending time in the drops. I've never been able to do this: To me, the drops are for descents and stiff headwinds, and little else. Unless you happen to like numb hands and aching shoulders.
- Get some clip-on aero bars for your road bike.
- It is awkward to shift while in aero, since there are no shifters on clip-on aero bars.
- It can be awkward to move to and from the aero bars, due to the geometry and placement of typical road bars.
- The aero position using clip-on aero bars is often not as aggressive as what you can achieve on a tri bike.
However, there is one more very important negative issue with clip-on aero bars: Weight distribution.
Your center of mass shifts forward on a road bike when in the aero position, much more than it does when riding in the drops. This shift can greatly increase the amount of your weight on the front wheel, which in turn can dramatically affect handling. One of the key design features of tri bikes is to bring the rear wheel as close under the rider as possible, specifically to address the weight shift issue.
If you choose to try clip-on aero bars, be prepared to also do the following:
- Get a tri bike fit in order to learn your optimum aero geometry.
- Select clip-on aero bars that, combined with handlebar height and stem adjustments, will bring you closest to your ideal aero position without negative effects.
First, it can ruin the usefulness of your bike when riding on the roads, when riding it as a road bike. You should ensure any adjustments you make do not significantly affect the handling or comfort of your road bike.
Second, road frames tend to make lousy tri bikes. That's why the tri bike frame was invented in the first place!
When I first got into triathlon a few years ago, I already had a good fit on my Trek Madone 5.2 road bike, and I bought a tri fit from JT at Moment for two reasons: First, to learn what a good tri fit felt like, and second, it was my initial step toward deciding if I wanted to budget for a tri bike. I was surprised at how different the two fits were, and how differently my body performed in each position.
While I really liked being in aero, my back didn't handle hammering in aero very well. So I figured I should wait on getting a pure tri bike, and got my clip-on aero bars as a first step. When my back completely failed a couple years ago, I had to get a TitanFlex to isolate my back from road shock and vibration, the alternative being to give up biking, and triathlon.
Over the past year I've been experimenting with tweaks to my bike fit on my infinitely adjustable TitanFlex AlTi. The only thing not adjustable on this bike is the wheelbase and the angle of the steering tube. The titanium support beam permits the seat to move forward and back over 4 inches with a similar vertical adjustment on my seat tube, and I have an adjustable stem that permits my handlebars to be moved almost anywhere, along with adjustable clip-on aero bars and elbow pads.
As I evolved my bike fit in the space between my road and tri fit values, I developed what I call my "troad" (tri-road) fit, where I've adjusted my seat post angle to be right between that of a tri and road bike, which is the furthest forward I could move my body on the TitanFlex frame without affecting handling. I also found I couldn't get quite as flat in aero as JT's fit permitted, though I did get surprisingly close.
I think I've found a sweet spot that gives me the best aero ride a road bike can offer. We'll see if it's true as I build volume into the Spring.
If you want to buy another bike, I would suggest taking a ride on a TitanFlex with clip-on aero bars, in addition to any tri bikes you try. Experiment with finding your "troad" fit. Instead of buying a second bike, you may be able to switch to a single bike that will give you the best of both worlds.
Be sure to also try clip-on aero bars on your current road bike: Combined with a new fit and some careful adjustments, you may find your own sweet spot.
Sunday, January 8, 2012
More On Hills
I've been continuing to examine why hills are so hard for me. Yes, I expected a large degree of additional effort, but there's no way I'm as ill-conditioned as my recent hill runs seemed to indicate. I must be wasting lots of energy, rather than harnessing it for propulsion.
After several more runs, I've discovered one of the reasons: Despite my best efforts to the contrary, I've been slightly over-striding while going uphill. The point where my forefoot contacts the ground was slightly in front of my knee, due largely to the angle of the slope. This caused me to 'step up' rather than 'fall forward', making progress more difficult.
So I made a conscious effort to get my uphill contact point back under my knee. When I did so, I noticed two things: First, going uphill now feels very much like running-in-place, where the contact point is forced to be under the knee. This is a very familiar and comfortable feeling which serves as a good check on foot strike.
Second, I'm now able to run faster uphill (for the same effort) because the later strike means more of the propulsion effort comes at the end of the stride, where the leg is straighter and the muscles work with greater mechanical advantage: More forward progress with the same level of muscle recruitment
The more I run, the more I realize how important running-in-place is to the development of a comfortable running gait.
Running downhill is still an issue for me: The downward slope means my heel contacts the ground earlier, and I've developed a small amount of continuous mild lower back pain. I've tried pointing my toes to give my calves more time to absorb the impact, but it just caused a greater impact at the time of contact, which my back converts to pain. I've tried running downhill in a slight squat, but that is way too fatiguing.
Well, it turns out that pointing my toes caused my contact point to once again move in front of my knee, creating more stopping force and making the impact worse rather than better. So, again, I had to focus on keeping the point of impact under my knee.
But this shortened my stride which slowed me down, so I tried increasing my turnover rate to well over 200 bps. This does help, some, but is too new to feel comfortable. I plan to create some high-speed drills to try to make it feel more natural (fast running-in-place for downhill, plus some high-knee running-in-place for uphill).
I put it all together during today's 5K run, and I improved my 'hilly PR' by a surprising 90 seconds. Minor technique tweaks can immediately yield major efficiency and speed gains.
The moral of the story so far is quite simple: No matter what the terrain is doing, always keep the point of contact under the knee, so it feels like running-in-place!
Subscribe to:
Posts (Atom)